Tuesday, June 15, 2010

Kay & Wayne's Paprika Wall Hanging 2009

Over the years I have made quilts for people to realize that often they are the quilts I wanted to make and not necessarily in the design or colors that the people wanted to receive. Although I don't always have a destination in mind when I make a quilt, I have come to realize that if I am making a quilt for someone specific I am better off if I have their input.  When I consider the money in fabric and time in assembly plus quilting, it would be nice if the recipient liked the quilt from the beginning.  (My son once described the fabric I intended to use in a king sized quilt for him as a "migraine in fabric".  I did change the fabric with his input before he knew my intentions.)

I have decided that going to the lake with Steve's family gets me into trouble.  There is a quilt shop relatively close by that has a way of parting me from my money.  I had never made a quilt for my sister-in-law of 35+ years and decided it was time.  So I asked Kay to pick out some base fabric with a design that pulled in 3 or more colors and select some quilt patterns she found appealing so I would have an idea of what she would like for a quilt. 

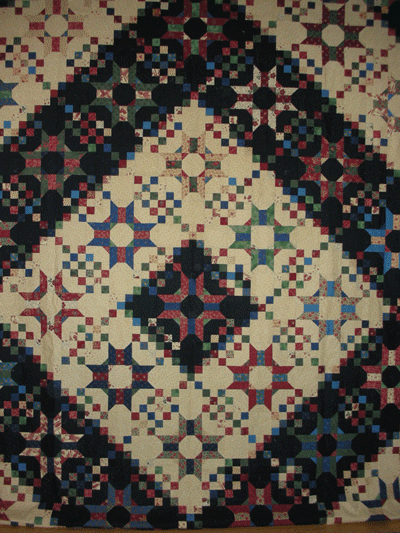
Kay found a great fabric that really pulled in the paprika color that she was using in her home.  The dark reds and greens played well with a gold/beige background colors.  We found a pattern called Savannah Star by Mary K Ryan designs that was well setup to showcase a 2 color quilt on a neutral background.

I have come to enjoy putting unexpected backs on my quilts and had seen this back in Scraps and Shirttails by Bonnie Hunter.  Although she did not have the pattern in the book her photo of the back was enough for me to play with and come up with my version of the design.

This photo is out of focus and doesn't do justice to the back.  Each of the triangles is an 8 inch half square triangle.  Since the star block is 4 by 4, the star block ends up at 32 inches - making the 4 block center 64 by 64.  I just needed to add more of the theme fabric for the border to finish off the back. 


I really like using leftover blocks or block parts plus unused fabric from the front to make my back.  As long as I am not trying to hand quilt the final project (and can keep my seams reasonably straight) I think the interesting back complements the front.

Baby Bear Quilt for Debi's Grandson

I have "bartered" quilts for haircuts with the lady who cuts my hair in the past.  In 2009 they became grandparents of a little boy.  Debi and her daughter-in-law picked out a cute baby bear pattern that came as a kit from Connecting Threads.  This was a nice little quilt that went together quickly and made a cute gift in contemporary fabrics.


Brian's Flannel Snuggle

Completed March 2009
I don't make a lot of flannel quilts but have found that the Fun and Done quilt patterns are great for lap quilts and warmers in the winter.  Brian, number 2 son, lives in Olympia, Washington where it is cold and cloudy most of the winter.  Brian asked for a flannel quilt for "lounging around" so this was his Christmas gift.


With Fun and Done quilts you:
  • cut squares of fabric for the backing, 
  • layer the backing - batt - 
  • add the  top "design" fabric step-by-step as you go along.  
This is a sew & flip method that quilts the block as you assemble the top.  When working with flannel, it is a real advantage to have the top and backing stabilized almost immediately.  Stretching out of shape has not been a problem.

When you have all of the blocks made, you just sew the backing fabrics together and use the extra fabric to create the sashing between the block.  I added the extra borders to the pattern for additional length.  I have not figured out the way to add the border and not have a break in the pattern for the 2nd and 3rd borders.  Someday I will spend the time to work that out.

Over the last year I have picked up some of the other Fun and Done patterns which I will have to try out.

Tuesday, June 1, 2010

A lesson in the quarter inch seam allowance

It all started because I was bored at the lake for a week.  I had under-estimated what I should take for handwork and so I went looking for a plan.  The local quilt shop had a nice Pacific Rim Quilt Company pattern called "You Are In Our Hearts" and some beautiful teal colored fabric from Jinny Beyer.  I thought "How perfect.  A pretty applique pattern that I can use for the center of a quilt." 

Steve's niece saw what I was working on and said that she liked the colors so I decided it could be the center of a quilt for Heather. I don't have a photo of the applique block available, I will add that when I put up the final quilt photos.  The applique went together without a hitch, a little fussy as it is 42 inches square as a whole cloth design but no real issues.


Knowing that the center was going to be this large applique block I needed something to frame it but not compete with the design.  I thought that a simple log cabin design in similar jeweled tones would be a nice accent.  Judy Martin's book on Log Cabin Designs had just come out so I went looking for a barn raising style of design to display the applique center on point.  I liked the layout of the "Summer Lake Log Cabin" but probably wasn't going to use the Grecian Scroll work around the outside.  Her book was great for organization of what can be a very disorganized pattern.

Once I got the central portion of the quilt blocks completed and up on the design wall I could see that the inspiration applique block was NOT going to work in this quilt.  Time to adjust and make the quilt using the full pattern from the book.  Again the blue tape fence for my quarter inch made for very consistent and easy piecing of all those logs.  I had to enlarge the quilt to work on a king size bed so I just kept making blocks.

I had the top completed in mid 2009, and then I started on the back.  The blocks are based on 1" logs making a 9" square.  If you enlarge the logs to 2" finished and keep the 9 log blocks then the finished square is 18 x 18.  The center star is made up of 16 blocks laid out 4 by 4.  With an 18 inch block that star becomes 72" by 72" - or enough to be a center of the back with fabric panels used to square it out for this large square quilt.  It actually was very easy enlarge the logs to make the back and add large sections of fabric to the edges.


The whole quilt was sandwiched in October and I started quilting on it.  I used dissolving thread for my stabilization lines because I wanted to use a feathered quilting design and did not want the straight lines remaining when I was done.  I did put it aside for a couple of months over the holidays as I worked on other things.  By January 1, 2010 the top, back and sandwiching was complete plus about 25% of the quilting.

I finished the quilting in May and am finishing the binding and trim work the first week of June.  This quilt is going to be in the Minnesota Quilt Show in mid-June.  Once all is complete I will post photos of the final results (no safety pins and batting sticking out all over).

Lone Star Maniac

Eighteen months ago (Oct 2008) American Patchwork & Quilting published a pattern by Laurie Simpson and titled it Reach for the Stars.  When I first saw it I thought it was way over the top.  But the more I looked at it the more I liked the huge Lone Star going from binding to binding.  I have always liked Lone Stars and have made a couple over the years (when I get around to posting the prior history quilts you will see some of them including Glad Creations Lone Star in Ohio and Jan Krantz's wall hanging quilt).

About the same time the magazine came out, we were talking at Glad's about what should be the shop challenge for the January 2011 staff quilt show.  There were lots of votes for the Lone Star which I thought was a good idea.  Knowing that I had never made a quilt for my brother-in-law and his wife I thought this would be a great project and a perfect setting for her style of fabrics: Americana.


This is a giant quilt at 116 by 116 inches.  At one point I did figure out that there are 2144 diamonds in the quilt.  I started cutting the fabric for this quilt the first week of January, 2010 and had the top finished the last week of March. 

Initially I followed the designers methodology to the letter. However, I was having trouble with my seams not laying flat so I reverted to using Jan Krantz's method for putting the diamonds together.  Once I was in my comfort zone the quilt went together rather quickly and the top lays perfectly flat.  I certainly did get practice with set-in seams and eight pointed stars. 

I was very careful to maintain my quarter inch seam and block each diamond unit as I went along.  Once I laid down my painter's blue tape as my seam allowance fence I did not move it until the whole project was complete.  (I am lucky to have side access to my bobbin so I did not have to remove the tape during the 3 months that I worked on this top.)  Between the initial pressing and blocking the diamond units through out the piecing process I went through 3 cans of spray starch keeping everything stable.
My next step will be to make the back for this monster and then get it quilted.  That will be sometime after the Minnesota Quilt Show in mid June.  Since there is sooooo much going on in the quilt the quilting is going to be very low keyed....maybe just a serpentine along the seam lines and a little something in the minimal background.  Not sure.

I will make this quilt, or actually a variation of it, again in the next year.  I already have the fabric selected.

Diana's Hug

My friend Diana has been out of work for a while - it feels like a lifetime to her. Although she lives in Maryland and they typically don't get more than a storm or two in the winter, this year has been disasterous for them.  I thought Diana could use a warm hug to get her through the long cold snowed in days.

I made this 4-Patch Posey top in 2009 and never got it quilted.  Well now it has a good home out east. This is a fun and quick pattern that really shows off the large prints particularly the florals.

I always put a custom label on my quilts with information about when the quilt was made, for whom, and the materials/threads/batting used to complete the quilt. It is easy to build a custom label on the computer using graphics available online and a more formal or casual font.  Using a good color printer I can print straight to fabric (i.e. Printables).  If I have a photo of the quilt, or the person for whom the quilt was made, before I make the label I  will often add a photo of the quilt on the label.

You gotta' start somewhere!

I have wanted to have a blog for quite some time.  Somehow I always felt like I wanted it to be done without the gittin' it done side of things.  Last week Steve and I went to Indiana for a week of his woodworking classes.  I took my sewing machine and a pieced and sandwiched quilt which I need to have done for the Minnesota Quilt Show (drop off is June 11th).  On the long drive out and back I kept thinking about what a poor job we do of documenting our respective projects and decided it was time to get started.

 April 25th, 2010

So the first quilt I am going to document is the quilt that I am making for the neighbors who watch our dog(s) when we are out of town.  Mary & Jerry have taken care of the zoo (Beaux, Dottie, Bullseye, Dude and Mocha) on many occasions over the years.  Every year I planned to make them a quilt for Christmas and just didn't get around to it until October - now that is thinking ahead.  This year, in February, I asked Mary to go out with me and pick out her fabric color and style.  

Mary choose a fairly traditional color pallet based on the Moda Vine Creek line.  Mary  really likes the quilts I make with a dark or black background.  I decided to use the Glad Creations pattern "Just Around the Corner" to complement the traditional fabric style and play off of the light/dark contracts in the background.

I was already committed to make this quilt for Christmas 2010 when my co-workers at Glad's decided that we should all enter a quilt in the June 2010 show using a Glad Creations pattern.  Suddenly my time-line was significantly shortened.  By the end of April I had the quilt top pieced and was planning the back and quilting designs.  Because the quilt was a little narrow for a queen sized bed, I added a Vine Creek border section to the left and right sides of the quilt.  

I decided that a black based backing fabric and a Hobbs Heirloom black batt would be best for this quilt.  Getting it pinned before I left for Indiana last week was a little challenging as was getting the stabilization lines quilted on small tables in a hotel room.  I am in the process now of completing the free motion quilting and should be putting on the binding by the end of the week.


Once the quilting is done and I have the sleeve on for the Minnesota quilt show (drop off day is just 10 days away!) I will take additional photos for the blog.


Now I will need to look backwards to what has already been done this year and then try to work through some of my archive quilts to at least get them documented.